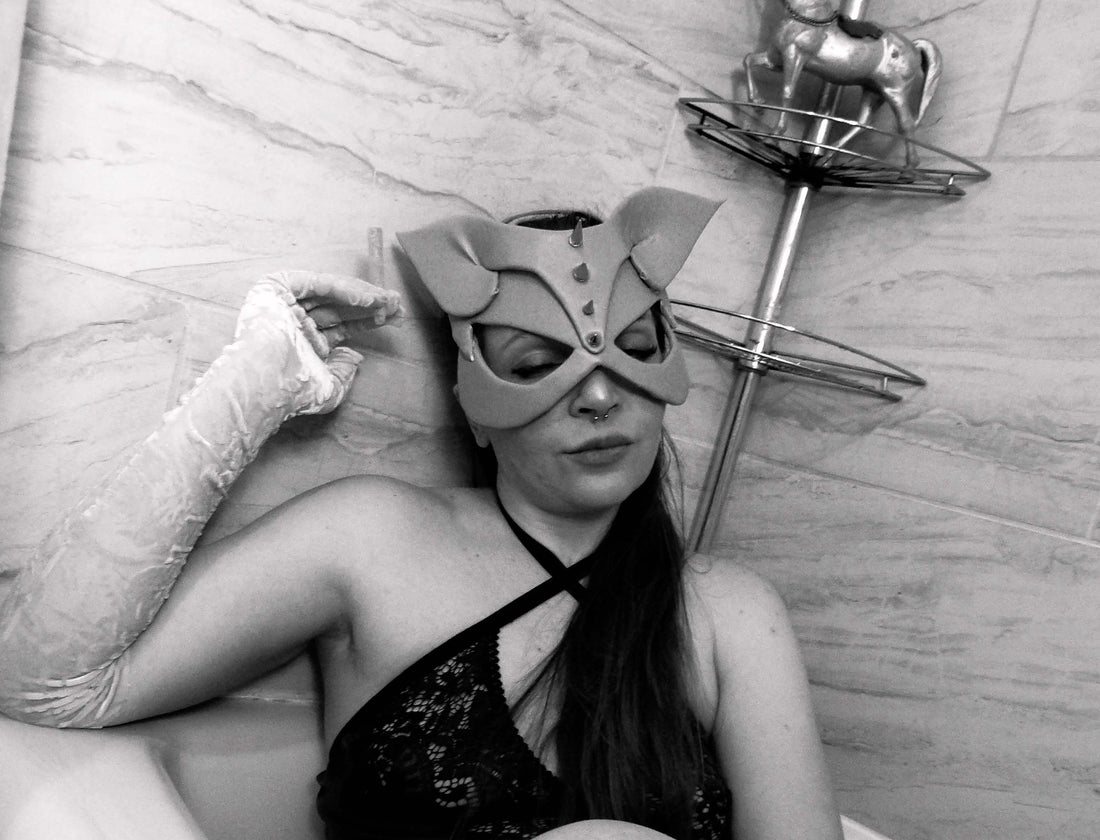
The Best, Easiest Guide for Creating your own Faux Leather (or Leather) Cat Mask!
Whether you are looking for a cheeky and unique accessory for a romantic or exhilarating occasion, or simply need a classy yet sexy mask to conceal part your face, the Faux Leather Cat Mask is a purrrfect match. My favorite aspect of this project is the immense range of ways to personalize your mask: faux leather comes in a huge variety of colors and textures and patterns (even embossed!), and adding details like rivets, studs, and hand stitching are excellent, and while faux leather is great, you can always choose to paint the EVA foam (if your feeling very artistic) or even paint on your faux leather! The materials needed for this project come at a relatively minimal expense, however some the materials will likely need to be purchased ahead of time, so plan ahead in terms of how of you want to embellish your mask and acquiring those necessary materials.
Materials List:
- Faux Cat Mask Patterns, printed and precisely cut out
- EVA foam of 4mm density
- Xacto Knife
- Iron on/ Heat Activated Adhesive Paper
- E6000 glue (or similar brand)
- Iron or heat gun
- Parchment paper
- Small Scissors
- Chalk or a white colored pencil to mark the EVA foam and faux leather
- Pen to mark the adhesive paper
- Clamps in sizes Small and Medium (the more available for you to use, the faster your project will go)
- Faux Leather and/or finishing paint of choice
- Rivets, Studs, Stitching, Etc materials for embellishment of choice
- thick mittens or heat protective gloves
- *optional* hair dryer, if you do not have a heat gun available.

Step 1:
Gather your materials. Print and precisely trim the 4 pattern pieces for the cat mask.
Step 2:
Trace pattern pieces 1 and 2 out on your EVA foam using the chalk or white colored pencil. Transfer the red and purple markings from the pattern onto your EVA foam so that are in the same locations. You can use different symbols (*, ^, O, Etc) rather than colors to differentiate between the two colors.

Step 3:
Trace pattern pieces 3 and 4 on both the adhesive paper and the faux leather. Cut them out precisely. Transfer the red and purple markings onto the backside of the faux leather, maintaining the same symbols as before to indicate the red and purple indications.

Step 4:
For the Face Mask: Line up your faux leather and heat adhesive pieces so that the eyes and all sides are even and matching, and with the peelable backing facing up to you and faux leather facing down to the tabletop. The "rough" side of the adhesive paper should be against the back side of your faux leather. The side with no pattern or less detail on any fabric is called the "wrong side" of the fabric. The patterned side is referred to as the "right side".

Step 5:
Put a single layer of parchment paper over your mask. Make sure this stays in place through the entirety of this step. Apply the heat adhesive paper to your faux leather by using either your iron or the heat gun to lightly apply heat to one section at a time. Be careful not to scorch or burn the faux leather, do not leave the heat appliance in anyone place for too long. I preferred to use my iron for this step, it is a miny or travel iron. A standard size iron will work fine as well.
Step 6:
Let your faux leather pattern piece cool entirely and then remove the backing paper.
Step 7:
Line up the faux leather face mask piece with the EVA foam mask piece so that the eye holes are centered as well as the middle of the mask and the opening at the top. Stack/ Line them up so that the EVA foam is facing down and to the table, the rough adhesive side of your faux leather is against the EVA foam, and the right side (patterned side) of your faux leather is facing up towards you. Place a large sheet of parchment paper over the entirety of the face mask piece.
Step 8:
Patiently and carefully heat the faux leather in one section at a time, be very mindful to not overheat any one section of the faux leather. You do not want to scorch, burn, or melt the faux leather! I preferred to use my heat gun for this step.
Step 9:
If you are using a heat gun, it helps to use a rolling pin or some other similar but heat resistant object to smooth the faux leather and foam in place while the adhesive is hot. If you are using an iron be very mindful to not melt the faux leather by keeping the iron moving. Make sure your parchment paper stays in place while you are working.
Step 10:
Repeat until the front of the mask is smooth and fully attached, with no bubbling. If you do find loose spots or bubbling, go back to those spots and lightly heat and smooth and press into place firmly but gently. Again, be very careful to not scorch your faux leather in this step, it is best to go slow and steady!
Step 11:
Wait for the mask piece to fully cool and seal on the front side. Put on your heat resistant gloves.
Step 12:
Flip your mask over to the EVA foam side and pick one eye. Heat the loose faux leather folds, where you can see the adhesive, at the inner corner of the eye, using either your heat gun on low or your hair dryer on high. Heat only until the adhesive becomes shiny and sticky, then immediately fold over, press and smooth into place on the back side of the EVA foam mask. Repeat until all open ends are closed at the corner of the eye and clamp in place with a small clamp.
Step 13:
Now repeat this heat, fold, press, seal, clamp process at the opposite corner of the eye. Leave the clamps in place.

Step 14:
Now repeat on the other eye.
Step 15:
Now seal the lower and upper edges of the eye and clamp in the same way.
Step 16:
Now start at the "nose" section of the mask, starting in the inner most section. Heat, seal, and clamp in the same manner we have been using so far. Repeat this process for the entirety of the mask, saving the upper opening for last and working at the center, then going out and around to the top of the mask. Do not worry if there are a few places that are not adhering well, we will go back and fix these next.
*Alternately you can use E6000 to press, seal, and clamp the excess to the back of your mask, if you do not have access to a heat gun or hair dryer that gets hot enough.
Step 17:
After the mask has fully cooled and cured in all places, gently remove all of the clamps. Check for any spots that did not adhere well and use a dot of E6000, press firmly in place and clamp in place.
Step 18:
Repeat Steps 4-16 for the ear pattern pieces. Leave the bottom "nose" point to seal last on this piece and follow the numbered ordered to heat/glue, press, and clamp. This order will have you fold in the bottom point in the order of middle, one side, other side.
Step 19:
Once dried, Remove all remaining clamps and trim any leftover or excess faux leather that is hanging.
Step 20:
Match the markings that are RED on the mask piece to create the mask shape: at each outer eye corner match the red dots from the pattern with each other, glue, press, clamp in place.
Step 21:
Repeat with other eye and opening at top of head. Wait atleast 30 minutes to 3 hours for the E6000 to fully cure before removing these clamps.
Step 22:
Now match the purple markings from the mask pattern piece to the ear pattern piece. Starting at the forehead/ top of head glue and clamp, then repeat this process for the nose area. Wait for this glue to cure fully before removing the clamps.
Step 23:
Match the purple markings at the inner sections of the ears, dot of glue, press, seal, clamp in place. This section may require two small clamps or one medium to stay put. Wait for this section to cure fully.

Step 24:
Match, glue, press, seal and clamp your outer ear markings on both sides. I found it imperative to use medium sized clamps for this section.

Step 25:
Create your head straps using the patterns and same methods from steps 4-16 to attach your faux leather to the head strap EVA foam pieces. Once fully cured you can attach your head strap using an upside down T method or a simple strap across the back. Use glue and clamps to attach the straps to the INSIDE (EVA foam side) of the mask. Make sure to attach the straps so that mask fits snug to your head and face but comfortably. You want to be able to take your mask on and off easily.
Step 26: Embellish!
Add the extra details of rivets, glitter, paint, etc. or keep that kitty mask smooth!

Have Fun!


