DIY Hand Dying Through Immersion Dye with Commercial Dyes
Hand Dying at home is a fun way to both reanimate and customize many household items, clothing and other garments, and much more. It is tremendous fun to re imagine a beloved item in your favorite color or to have the power to customize a gift to the perfect color or shade. The local store will more than likely carry at least one brand of fabric dye in both powder and liquid form. In my region RIT dye is the most popular. I often find RIT dye to be the most effective commercial dye that is readily available to use on my projects. I am a huge fan of the convenience of the liquid dyes and the lovely variety of colors. RIT rolls new shades out year round, often replacing a couple of lovely seasonal shade with even more pleasing tones the next season. I personally really love the depth in the eggplant shade RIT just released and I can not wait to find a personal project to apply it to.
RIT is a permanent dye, and will stain most surfaces if left in contact for even short periods of time. I once spilled warm RIT on the beautiful, historically accurate refurbished wood floors in my step mothers kitchen. I sat furiously scrubbing with highly absorbent rags and vinegar mixed with dish soap for half an hour to remove the staining that had initially been immediately apparent. Of course RITS ability to dye also includes your hands and many other surfaces! RIT will stain your hands, though not permanent it can be a bit of a nuisance to remove. I highly recommend wearing latex gloves, or which ever disposable protective gloves you prefer. As I will be discussing the stove top dying method this will protect your hands slightly from the heat and staining. Please keep in mind that I have noticed that RIT (and every other commercial, non-organic dye) is a bit caustic to the skin. I do include a link below to help with removing staining from hands. Do not get RIT dye near your face any other body parts. Do not ingest RIT, avoid the fumes and only use RIT in a well ventilated location. Please be mindful of all of the warnings on the packaging and follow the instructions on your RIT package carefully and thoughtfully. RIT is a fun project but I avoid dying large amounts of material, for continuous hours, when my children are home as even in a well ventilated area the fumes are noticeable.
First you need to determine the type of dye you plan to use. Today and I am specifically discussing RIT All-Purpose Dye, as it has a large variety of applications and the instructions for RIT DyeMore Synthetic Fiber Dye are almost identical, with the exception of a difference in applicable materials and substitution in one supply ingredient, which I will make note of as we go along. Rit All Purpose Dye is excellent for natural fabrics such as cotton, ramie, silk, wool, linens, and even nylon and rayon. RIT DyeMore Synthetic Fiber Dye is excellent for polyester, acrylic, acetate and anything containing more than 35% synthetic material.
Next you will want to pick a method to dye your project. I am expressly discussing the stove top method here, however it is important to note there are other methods available that can potentially offer less or easier clean up with varying results. I prefer the stove top method as I get the most vibrant and lasting results through this application. I always need to prepare my workspace and dedicate time afterwards to cleanup carefully and thoroughly. For general dye projects you can use the sink/bucket method, this makes clean up relatively easy and yields good results. To dye large yards of fabric (bedding, large curtains, etc) or for simplified application and very little clean up use the washing machine method. Links are listed below to reach the RIT how to dye page for these other two methods and to explore so much more!
There are only a few supplies you will need to gather to ensure your hand dying project is fun and effective, and not too messy. Please keep in mind how much RIT you will need, I often follow about 3 yards of medium fabric at most for one bottle. RIT does recommend to go by fabric weight: 2 pounds of fabric require one bottle of dye or two packets powder.
Materials:
- RIT All-Purpose Dye
- Stainless Steel Pot
- Large Stainless Bowl (to create a double boiler, see link below)
- Measuring Cup
- Metal Tongs or Metal Chopsticks
- Latex Gloves or other protective, disposable gloves
- Plastic Table cover
- Dishwashing Liquid
- Salt (For Rit All-Purpose Dye)
or
- Vinegar (for RIt DyeMore Synthetic Fiber Dye)
Preliminary Steps:
- Prewash the fabric you are going to dye. Any type of stain or fabric finishes may interfere with dye absorption.
- Lighten or otherwise alter the pre existing fabric color if needed. If the fabric you are choosing is white or off white then the true color you are trying to achieve is more likely. There is a link below regarding changing an existing color to achieve the desired color and shade.
- Test dye a sample or scrap of the material you wish to dye. This helps you determine if you will need more or less of the dye than the standard, depending on the shade you wish to achieve. It is not uncommon to need less or even twice as much as the 1 bottle of RIT Dye to 2 lbs of fabric standard. This also gives you the opportunity observe if any preexisting patterns or logos are going to bleed or interact with the RIT dye in any way.
- Weigh your fabric or use my general method of no more than 3 yds of medium for one bottle of RIT, so that you know if you need more than one bottle (2 packets) and if so how many.
Once your fabric is clean and as stain free as possible and after you know exactly how much RIT dye you will need, you are ready to set up your work space. I usually start by covering the counter area between the stovetop and the sink with the plastic table cover. Since I am doing this weekly, sometimes several times a week, I will clean off, hang dry, fold, and reuse my plastic table cover. Be very careful to not put the classic table cover on or anywhere too near your stovetop, you do not want to melt the plastic or create any type of fire hazard.
My Hand Dying - Immersion Method:
- Set up your work space for easy clean up. Cover your work area with the plastic cover and keep paper towels nearby for quick clean up of any spills.
- Wear gloves to protect your hands and make sure your work area is well ventilated.
- Fill the large stainless pot with hot water and set to med-high to achieve boil. Place your large Stainless steel bowl over the top, it needs to be large enough to not fall in, but seed on top instead. The bowl needs to be filled with enough warm water for the fabric to be fully submerged and move freely. * I prefer the double boiler method to preserve the longevity of my pan. See the link below for a video on how to setup this simple method.
- Add 1 c of Salt for RIT All-Purpose Dye or add 1 c of Vinegar for Rit DyeMrore Synthetic Fibers Dye
- Add 1 tsp dish detergent to promote level dying
- Heat to a boil, or just below
- Dissolve your powder dye in a separate 2 cups of warm water, if using a powder.
- Add your dye to the hot Large Bowl of water on the double boiler and gently stir with your metal tongs/chopsticks.
- Test your dye with a piece of paper towel. If too light add more dye, if too dark add more water and stir carefully but well.
- Get the fabric your dying damp and the carefully and slowly add it to the dye bath until fully and evenly submeged.
- It is crucial to stir gently and evenly for the next 10 minutes or so to ensure the dye is absorbed evenly.
- Fabric can remain in the dye bath for 10 minutes and up to an hour, depending on the fabric absorbancy and the depth in color you wish to achieve. Damp fabric will look darker, and will dry to slightly lighter shade.
- With oven mitts and great care, transfer the bowl or pot over to the sink. Use the tongs or chopsticks to remove all articles of fabric and place in a safe spot in the sink to be rinsed, but not lost down the drain.
- Start by rinsing with warm water until the water runs clear then rinse with cool water. (At this point I transfer my bowl full of dye over to somewhere safe to cool, and will keep all viable remaining dye to start next weeks orders with)
- Finally, wash in warm water with a mild detergent, rinse and dry.
- Enjoy the fun new shade you made!
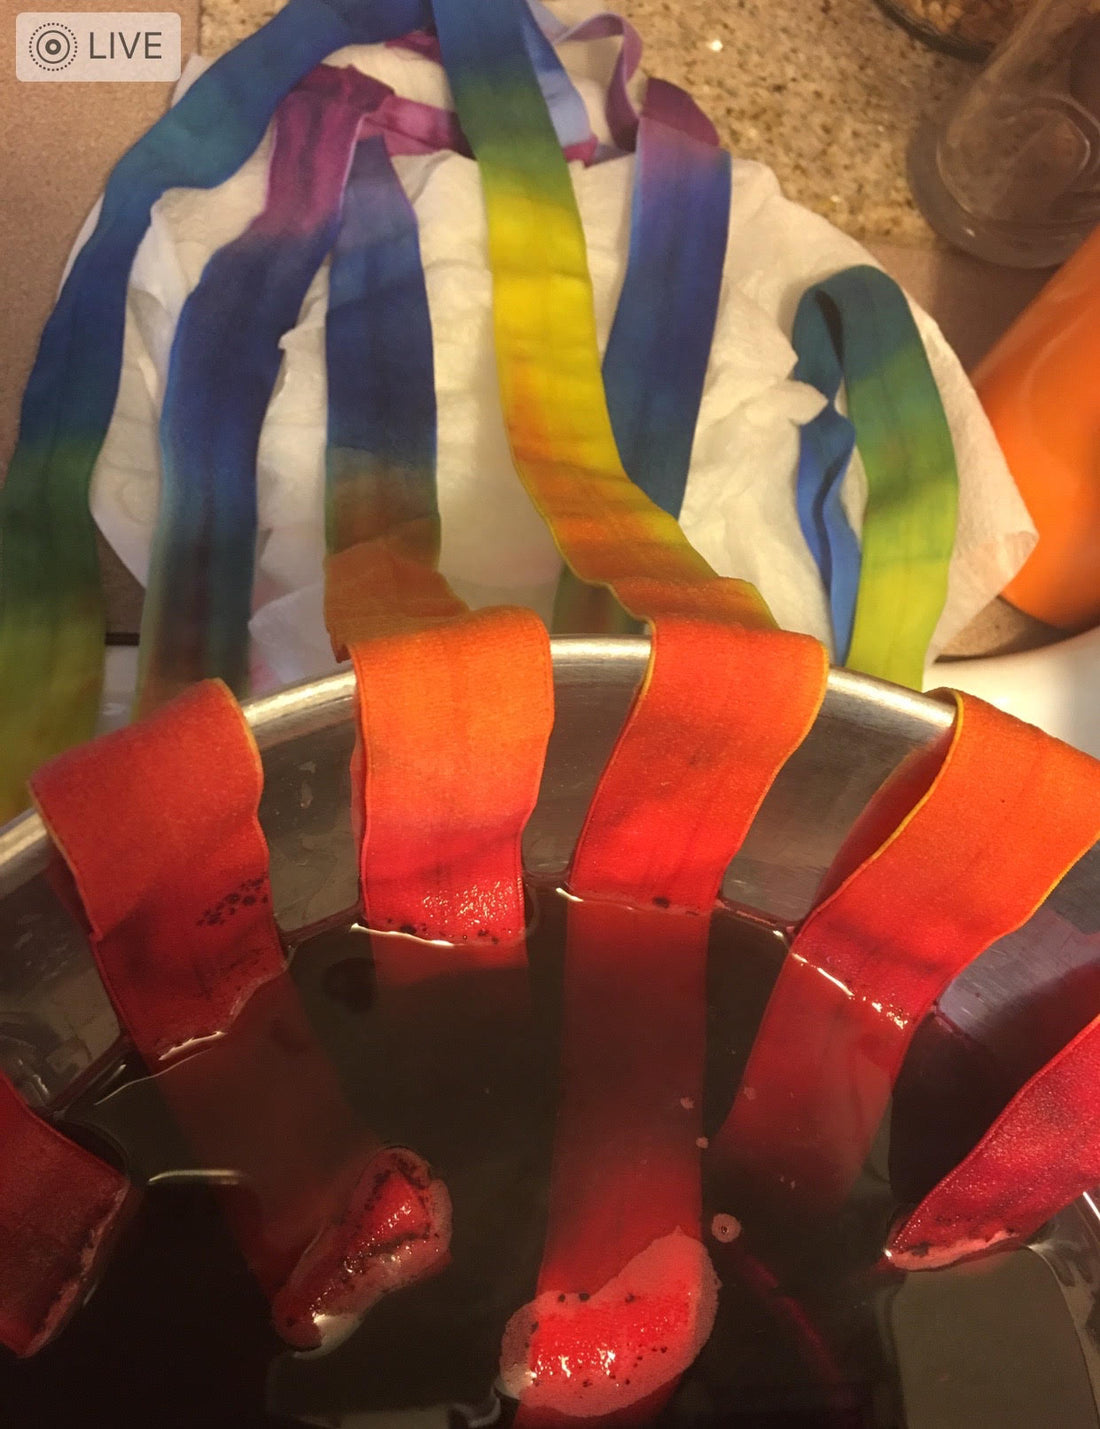
This is the simple method I use on my lace and elastic and the robes in my shop. Hand dying through the Immersion Method is potentially one of my favorite aspects of my job. It is incredibly satisfying to achieve a large variety of colors to customize nearly all of my items in my shop for my customers. I also love changing the color of my bedding and curtains once and awhile with out having to buy all new. My daughters love when I customize clothing for them and this often starts with a very thoughtful and inspired dye bath.


Helpful Links and Resources used:
https://www.ritdye.com/how-to-dye/